dapr入门
Dapr是什么?
Dapr 是 Distributed Application Runtime (分布式应用运行时)的缩写。
工作方式
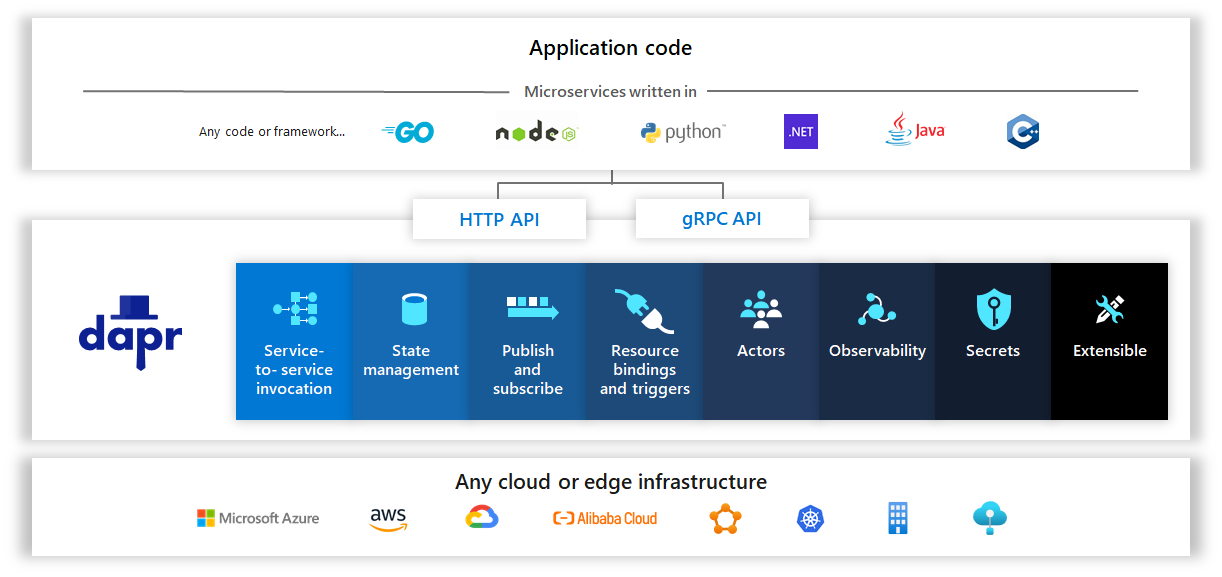
Dapr向每个计算单元注入了一个Sidecar容器/进程。Sidecar与事件触发器进行交互,并通过标准HTTP或gRPC协议与计算单元进行通信。这使Dapr能够支持所有现有和将来的编程语言,而无需您导入框架或库。
Dapr通过标准的HTTP verbs 或gRPC interface 提供内置的状态管理,可靠消息传递(至少一次传递),触发器和绑定。这使您可以遵循相同的编程范例编写无状态,有状态和类似于actor的服务。您可以自由选择一致性模型,线程模型和消息传递模式。
Dapr在Kubernetes上原生运行,也可以作为机器上的独立二进制文件,在IoT设备上运行,也可以作为容器注入到任何系统中,无论是在云端还是在本地。
Dapr使用可插拔状态存储和消息总线(例如Redis)以及gRPC来提供广泛的通信方法,包括使用gRPC的直接 dapr-to-dapr 通讯和具有保证传递和至少一次语义的异步Pub-Sub。
资料收集
官方网站
社区
- dapr-cn :Dapr中文社区,专注于dapr的文档、新闻稿本地化、新特性贡献以及中文社区推广
- Dapr 中文文档库 : Dapr 中文文档库,由 dapr-cn 创建并维护的对 docs.dapr.io 内容的翻译,旨在为更熟悉中文的开发者提供一些文档上的帮助。
备注:由于dapr翻译计划已经启动,我也参与其中,我在学习笔记中翻译的部分官方文档内容都将陆续迁移过去,之后会删除学习笔记中的官方文档翻译内容。
文档
文章&演讲
介绍性的文章:
- Announcing Distributed Application Runtime (Dapr), an open source project to make it easier for every developer to build microservice applications : 2019-10-16
- 重磅!微软开源微服务构建软件 Dapr : 2019-10-17,上文的中文翻译。
- 2020年第一次技术沙龙——体验新云原生技术OAM&DAPR : 2020-01-12,参会介绍,有不少有见地的个人想法和见解,值得一读。
实践性的文章:
- Simplifying Microservices on Kubernetes with Microsoft’s Dapr : 2019-11-08,写的很细致
视频
- TGI Kubernetes 105: Dapr - Distributed Application Runtime : 2020-02-14
- OAM&Dapr-Dapr 简介-如何帮助开发者轻松构建应用程序 : 2020-02-13
- Dapr - Distributed Application Runtime - An event-driven portable runtime for | MLS1070 : 2020-01-15
- Mark Russinovich Presents the Future of Cloud Native Applications with OAM and dapr | BRK3098 : 2020-01-14
- Dapr, Rudr, OAM | Mark Russinovich presents next gen app development & deployment (Microsoft Ignite) : 2019-11-14
- Learn all about Distributed Application Runtime (Dapr), Part 1 | Azure Friday : 2019-10-25
相关资料
- The Evolution of Distributed Systems on Kubernetes : Bilgin Ibryam, 讲的极好。强烈推荐
- https://www.slideshare.net/AbhishekGupta126/tour-of-dapr?from_action=save
- The evolution of Distributed Systems : 另一个总结分布式系统演进的文章,比较全面,有很多典型的图片。
实战分析
案例来自:Hello World 。演示如何在本地运行Dapr。 重点介绍服务调用和状态管理。具体可以看链接,这里记录一下,分析dapr的运行逻辑。
有一个nodejs应用
const express = require('express');
const bodyParser = require('body-parser');
require('isomorphic-fetch');

const app = express();
app.use(bodyParser.json());

const daprPort = process.env.DAPR_HTTP_PORT || 3500;
const stateStoreName = `statestore`;
const stateUrl = `http://localhost:${daprPort}/v1.0/state/${stateStoreName}`;
const port = 3000;

app.get('/order', (_req, res) => {
    fetch(`${stateUrl}/order`)
        .then((response) => {
            if (!response.ok) {
                throw "Could not get state.";
            }

            return response.text();
        }).then((orders) => {
            res.send(orders);
        }).catch((error) => {
            console.log(error);
            res.status(500).send({message: error});
        });
});

app.post('/neworder', (req, res) => {
    const data = req.body.data;
    const orderId = data.orderId;
    console.log("Got a new order! Order ID: " + orderId);

    const state = [{
        key: "order",
        value: data
    }];

    fetch(stateUrl, {
        method: "POST",
        body: JSON.stringify(state),
        headers: {
            "Content-Type": "application/json"
        }
    }).then((response) => {
        if (!response.ok) {
            throw "Failed to persist state.";
        }

        console.log("Successfully persisted state.");
        res.status(200).send();
    }).catch((error) => {
        console.log(error);
        res.status(500).send({message: error});
    });
});

app.delete('/order/:id', (req, res) => {
    const key = req.params.id;
    console.log('Invoke Delete for ID ' + key);

    const deleteUrl = stateUrl + '/' + key;

    fetch(deleteUrl, {
        method: "DELETE",
        headers: {
            "Content-Type": "application/json"
        }
    }).then((response) => {
        if (!response.ok) {
            throw "Failed to delete state.";
        }

        console.log("Successfully deleted state.");
        res.status(200).send();
    }).catch((error) => {
        console.log(error);
        res.status(500).send({message: error});
    });
});

app.listen(port, () => console.log(`Node App listening on port ${port}!`));
注意这里的
const stateStoreName = `statestore`;
const stateUrl = `http://localhost:${daprPort}/v1.0/state/${stateStoreName}`;
这个stateStoreName和我们之前通过dapr init生成的statestore.yaml保持一致的,这个文件可以去$HOME$\dapr目录下找到。
apiVersion: dapr.io/v1alpha1
kind: Component
metadata:
  name: statestore
spec:
  type: state.redis
  version: v1
  metadata:
  - name: redisHost
    value: localhost:6379
  - name: redisPassword
    value: ""
  - name: actorStateStore
    value: "true"
看下app.py
import os
import requests
import time

dapr_port = os.getenv("DAPR_HTTP_PORT", 3500)
dapr_url = "http://localhost:{}/v1.0/invoke/nodeapp/method/neworder".format(dapr_port)

n = 0
while True:
    n += 1
    message = {"data": {"orderId": n}}

    try:
        response = requests.post(dapr_url, json=message, timeout=5)
        if not response.ok:
            print("HTTP %d => %s" % (response.status_code,
                                     response.content.decode("utf-8")), flush=True)
    except Exception as e:
        print(e, flush=True)

    time.sleep(1)
下载好依赖后通过dapr执行这个python程序,就能看到Node程序不断接收到请求
pip3 install requests
dapr run --app-id pythonapp cmd /c "python3 app.py"
收藏文章