SpringCloudNacos使用
Nacos 是 Spring Cloud Alibaba 核心组件之一,可以用作 Spring Cloud 的注册中心和配置中心。
本文讲述如何在 Spring Cloud 中使用 Nacos 作为配置中心。
安装Nacos
与 Spring Cloud Config 和 Eureka 的使用方式不同,Nacos Server 需要独立部署。Nacos Server 的部署方式包括单机模式和集群模式,集群模式可以解决 Nacos 高可用的问题。
为简单起见,本文采用单机模式 Nacos Server 作为配置中心。单机模式搭建过程比较简单,可以通过下载源代码编译方式安装和二进制可执行文件安装。
具体安装步骤可以参考官方文档:
https://nacos.io/zh-cn/docs/quick-start.html
安装完成后,使用用户 nacos 和密码 nacos 访问 Nacos 控制台:

图中可以看到访问端口被改成了 8868,而不是 8848。Nacos Server 启动端口的修改也比较简单,修改其配置文件 conf/application.propertie 中端口配置 server.port 即可。
创建Spring Boot项目
利用 IntelliJ Idea 创建 Spring Boot项目,其中的父(parent )项目 springboot-nacos 的 pom.xml 内容如下:
<?xml version="1.0" encoding="UTF-8"?>
<project xmlns="http://maven.apache.org/POM/4.0.0" xmlns:xsi="http://www.w3.org/2001/XMLSchema-instance"
         xsi:schemaLocation="http://maven.apache.org/POM/4.0.0 https://maven.apache.org/xsd/maven-4.0.0.xsd">
    <modelVersion>4.0.0</modelVersion>
    <groupId>com.example</groupId>
    <artifactId>springboot-nacos</artifactId>
    <packaging>pom</packaging>
    <version>1.0</version>
    <modules>
        <module>nacosprovider</module>
        <module>nacosconsumer</module>
        <module>nacosconfig</module>
    </modules>
    <dependencies>
        <dependency>
            <groupId>org.springframework.boot</groupId>
            <artifactId>spring-boot</artifactId>
        </dependency>
        <dependency>
            <groupId>org.springframework.boot</groupId>
            <artifactId>spring-boot-autoconfigure</artifactId>
        </dependency>
    </dependencies>

    <parent>
        <groupId>org.springframework.boot</groupId>
        <artifactId>spring-boot-starter-parent</artifactId>
        <version>2.3.7.RELEASE</version>
        <relativePath/> <!-- lookup parent from repository -->
    </parent>

    <properties>
        <project.build.sourceEncoding>UTF-8</project.build.sourceEncoding>
        <spring-cloud.version>Hoxton.SR9</spring-cloud.version>
        <java.version>1.8</java.version>
    </properties>

    <dependencyManagement>
        <dependencies>
            <dependency>
                <groupId>org.springframework.cloud</groupId>
                <artifactId>spring-cloud-dependencies</artifactId>
                <version>${spring-cloud.version}</version>
                <type>pom</type>
                <scope>import</scope>
            </dependency>

            <dependency>
                <groupId>com.alibaba.cloud</groupId>
                <artifactId>spring-cloud-alibaba-dependencies</artifactId>
                <version>2.2.3.RELEASE</version>
                <type>pom</type>
                <scope>import</scope>
            </dependency>
        </dependencies>
    </dependencyManagement>
</project>
上述内容主要三部分:
parent:定义spring boot的版本dependencyManagement:spring cloud的版本以及spring cloud alibaba的版本,由于spring cloud alibaba还未纳入spring cloud的主版本管理中,所以需要自己加入dependencies:当前应用要使用的依赖内容。这里主要新加入了Nacos的服务注册与发现模块:spring-cloud-starter-alibaba-nacos-discovery。由于在dependencyManagement中已经引入了版本,所以这里就不用指定具体版本了。
**注意:**这里版本关系需要对应清楚,不然会踩很多坑。
更多版本对应关系参考:版本说明 Wiki
子项目-nacosconfig
父项目的 pom.xml 定义了 Spring Cloud 和 Spring Cloud Alibaba 依赖版本,这样,各子项目都使用同一版本下的子依赖版本。
接着创建一个名称为 nacosconfig 的 module 。nacosconfig 的 pom.xml 内容如下:
<?xml version="1.0" encoding="UTF-8"?>
<project xmlns="http://maven.apache.org/POM/4.0.0"
         xmlns:xsi="http://www.w3.org/2001/XMLSchema-instance"
         xsi:schemaLocation="http://maven.apache.org/POM/4.0.0 http://maven.apache.org/xsd/maven-4.0.0.xsd">
    <parent>
        <artifactId>springboot-nacos</artifactId>
        <groupId>com.example</groupId>
        <version>1.0</version>
    </parent>
    <modelVersion>4.0.0</modelVersion>

    <artifactId>nacosconfig</artifactId>

    <dependencies>
        <dependency>
            <groupId>com.alibaba.cloud</groupId>
            <artifactId>spring-cloud-starter-alibaba-nacos-config</artifactId>
        </dependency>
        <dependency>
            <groupId>org.springframework.boot</groupId>
            <artifactId>spring-boot-starter-web</artifactId>
        </dependency>
        <dependency>
            <groupId>org.springframework.boot</groupId>
            <artifactId>spring-boot-starter-test</artifactId>
            <scope>test</scope>
        </dependency>
    </dependencies>

    <build>
        <plugins>
            <plugin>
                <groupId>org.springframework.boot</groupId>
                <artifactId>spring-boot-maven-plugin</artifactId>
                <configuration>
                    <finalName>${project.name}</finalName>
                </configuration>
            </plugin>
        </plugins>
    </build>
</project>
nacosconfig 的 pom.xml 继承自 springcloudstudy 的 pom.xml。且引入依赖:
spring-cloud-starter-alibaba-nacos-config:作为 Nacos 客户端读取 Nacos 配置spring-boot-starter-web:对外提供 Web 接口
使用 Nacos 配置
在 nacosconfig 项目 bootstrap.yml 配置文件添加应用名称和 Nacos Server 地址:
spring:
  application:
    name: nacosconfig
  cloud:
    nacos:
      config:
        server-addr: localhost:8848
        file-extension: yaml
之所以需要配置 spring.application.name 的名称,是因为它是构成 Nacos 配置 Data Id 的一部分。Nacos Data Id 完整格式如下:
${prefix}-${spring.profiles.active}.${file-extension}
prefix:默认为spring.application.name的值spring.profiles.active:即当前环境对应的 profile,如果为空,则-${spring.profiles.active}为空file-extension:配置内容格式,支持properties和yaml格式
Nacos Server 有关配置:
server-addr:Nacos Server 地址file-extension:Nacos Data Id 配置格式,此处配置为yaml格式
即,采用上述配置,nacosconfig 会从 Nacos Server 读取 Data Id 为 nacosconfig.yaml 的配置。
这里关于配置的更多使用可以参考:Spring Cloud Alibaba基础教程:Nacos配置的加载规则详解
例子一:如果我们不想通过服务名来加载,那么可以增加如下配置,就会加载到Data ID=example.properties,Group=DEFAULT_GROUP的配置内容了:
spring.cloud.nacos.config.prefix=example
例子二:如果我们想要加载yaml格式的内容,而不是Properties格式的内容,那么可以通过如下配置,实现加载Data ID=example.yaml,Group=DEFAULT_GROUP的配置内容了:
spring.cloud.nacos.config.prefix=example
spring.cloud.nacos.config.file-extension=yaml
例子三:如果我们对配置做了分组管理,那么可以通过如下配置,实现加载Data ID=example.yaml,Group=DEV_GROUP的配置内容了:
spring.cloud.nacos.config.prefix=example
spring.cloud.nacos.config.file-extension=yaml
spring.cloud.nacos.config.group=DEV_GROUP
从Nacos读取端口配置
在 Nacos 控制台添加一个新的配置,其中:
- Data Id:
nacosconfig - Group:
DEFAULT_GROUP - 配置格式:
YAML
配置内容:
server:
  port: 9080

user: will
启动 nacosconfig 项目,可以看到打印日志:
2021-06-06 11:00:28.146 INFO 25112 — [ main] o.s.b.w.embedded.tomcat.TomcatWebServer : Tomcat initialized with port(s): 9080 (http)
即说明 nacosconfig 项目监听端口从默认的 8080 改成了 9080。
从Nacos读取变量配置
package will;

import org.springframework.beans.factory.annotation.Value;
import org.springframework.boot.SpringApplication;
import org.springframework.boot.autoconfigure.SpringBootApplication;
import org.springframework.cloud.context.config.annotation.RefreshScope;
import org.springframework.web.bind.annotation.GetMapping;
import org.springframework.web.bind.annotation.RestController;

@SpringBootApplication
public class NacosConfigApplication {
    public static void main(String[] args) {
        SpringApplication.run(NacosConfigApplication.class, args);
    }

    @RestController
    @RefreshScope
    static class TestController {

        @Value("${user}")
        private String user;

        @GetMapping("/test")
        public String hello() {
            return user;
        }
    }
}
通过rest接口,获取变量user的值,为实现配置自动更新,使用了注解 @RefreshScope。
访问 http://localhost:9080/test,返回:
will
在 Nacos 控制台修改 nacosconfig 配置,将 user 值修改为 will.change,可以看到 nacosconfig 项目打印日志:
2021-06-07 15:44:37.651 INFO 25112 — [88.115.137_8868] c.a.n.client.config.impl.ClientWorker : [fixed-10.88.115.137_8868] [data-received] dataId=nacosconfig, group=DEFAULT_GROUP, tenant=null, md5=396057d762f85e3cfa28e2d2f450e722, content=server: port: 9080 user: will.change, type=yaml
说明 nacosconfig 项目已接收到最新的 Nacos 配置。
访问 http://localhost:9080/test,返回:
will.change
配置实现了动态更新。
子项目-nacosprovider
创建服务提供者 nacosprovider 作为子项目。
添加 nacosprovider 的依赖:
<dependency>
	<groupId>com.alibaba.cloud</groupId>
	<artifactId>spring-cloud-starter-alibaba-nacos-discovery</artifactId>
</dependency>
<dependency>
	<groupId>org.springframework.boot</groupId>
	<artifactId>spring-boot-starter-web</artifactId>
</dependency>
其中,依赖 spring-cloud-starter-alibaba-nacos-discovery 用于连接 Nacos Server 注册中心。
bootstrap.yml 配置 Nacos Server 地址,以及服务名称:
server:
  port: 8060

spring:
  application:
    name: nacos-provider

  cloud:
    nacos:
      discovery:
        server-addr: localhost:8848
spring.application.name 用于配置服务名称,这个名称会在 Nacos 控制台服务列表上展示。
在 Spring Boot 启动主类添加 @EnableDiscoveryClient 注解,开启服务注册功能:
@SpringBootApplication
@EnableDiscoveryClient
public class NacosproviderApplication {
    public static void main(String[] args) {
        SpringApplication.run(NacosproviderApplication.class, args);
    }
}
增加 controller 接口:
@RestController
public class ProviderController {
    @RequestMapping(value = "/echo/{string}", method = RequestMethod.GET)
    public String echo(@PathVariable String string) {
        return "Hello Nacos Discovery " + string;
    }
}
子项目-nacosconsumer
添加服务消费者 nacosconsumer 的依赖:
<dependency>
	<groupId>com.alibaba.cloud</groupId>
	<artifactId>spring-cloud-starter-alibaba-nacos-discovery</artifactId>
</dependency>
<dependency>
	<groupId>org.springframework.boot</groupId>
	<artifactId>spring-boot-starter-web</artifactId>
</dependency>
<dependency>
	<groupId>org.springframework.cloud</groupId>
	<artifactId>spring-cloud-starter-openfeign</artifactId>
</dependency>
其中,依赖 spring-cloud-starter-openfeign 用于使用 feign 客户端调用服务接口。
nacosconsumer 的 bootstrap.yml 配置:
server:
  port: 8070

spring:
  application:
    name: nacos-consumer

  cloud:
    nacos:
      discovery:
        server-addr: localhost:8848
其中,服务名称 spring.application.name 配置为 nacos-consumer。
调用服务提供者
在启动主类添加 @EnableFeignClients 注解启用 feign 客户端的使用,添加 @EnableDiscoveryClient 注解开启服务注册功能:
@SpringBootApplication
@EnableDiscoveryClient
@EnableFeignClients
public class NacosconsumerApplication {
    public static void main(String[] args) {
        SpringApplication.run(NacosconsumerApplication.class, args);
    }
}
使用注解 @FeignClient 定义 feign 客户端,将远程服务 http://nacos-provider/echo/ 映射为本地方法调用:
@FeignClient("nacos-provider")
public interface ProviderClient {
    @RequestMapping(value = "/echo/{string}", method = RequestMethod.GET)
    String echo(@PathVariable String string);
}
Feign 客户端能将服务名称 nacos-provider 映射为 nacosprovider 的地址,这是由于 nacosconsumer 和 nacosprovider 都已经连接上了 Nacos Server 注册中心,nacosconsumer 可以从注册中心获取 nacosprovider 的 ip 和端口。
nacosconsumer 提供 controller 接口,以测试调用 nacosprovider 接口:
@RestController
public class ConsumerController {
    @Autowired
    ProviderClient providerClient;

    @RequestMapping(value = "/echo/{str}", method = RequestMethod.GET)
    public String echo(@PathVariable String str) {
        return providerClient.echo(str);
    }
}
其中,通过 @Autowired 注解,使用上面定义的 feign 客户端。可以看到 ,通过 feign 客户端,调用远程服务接口就像调用本地方法一样。
启动 nacosconsumer 和 nacosprovider 后,可以看到 Nacos 控制台服务列表显示出两个服务:
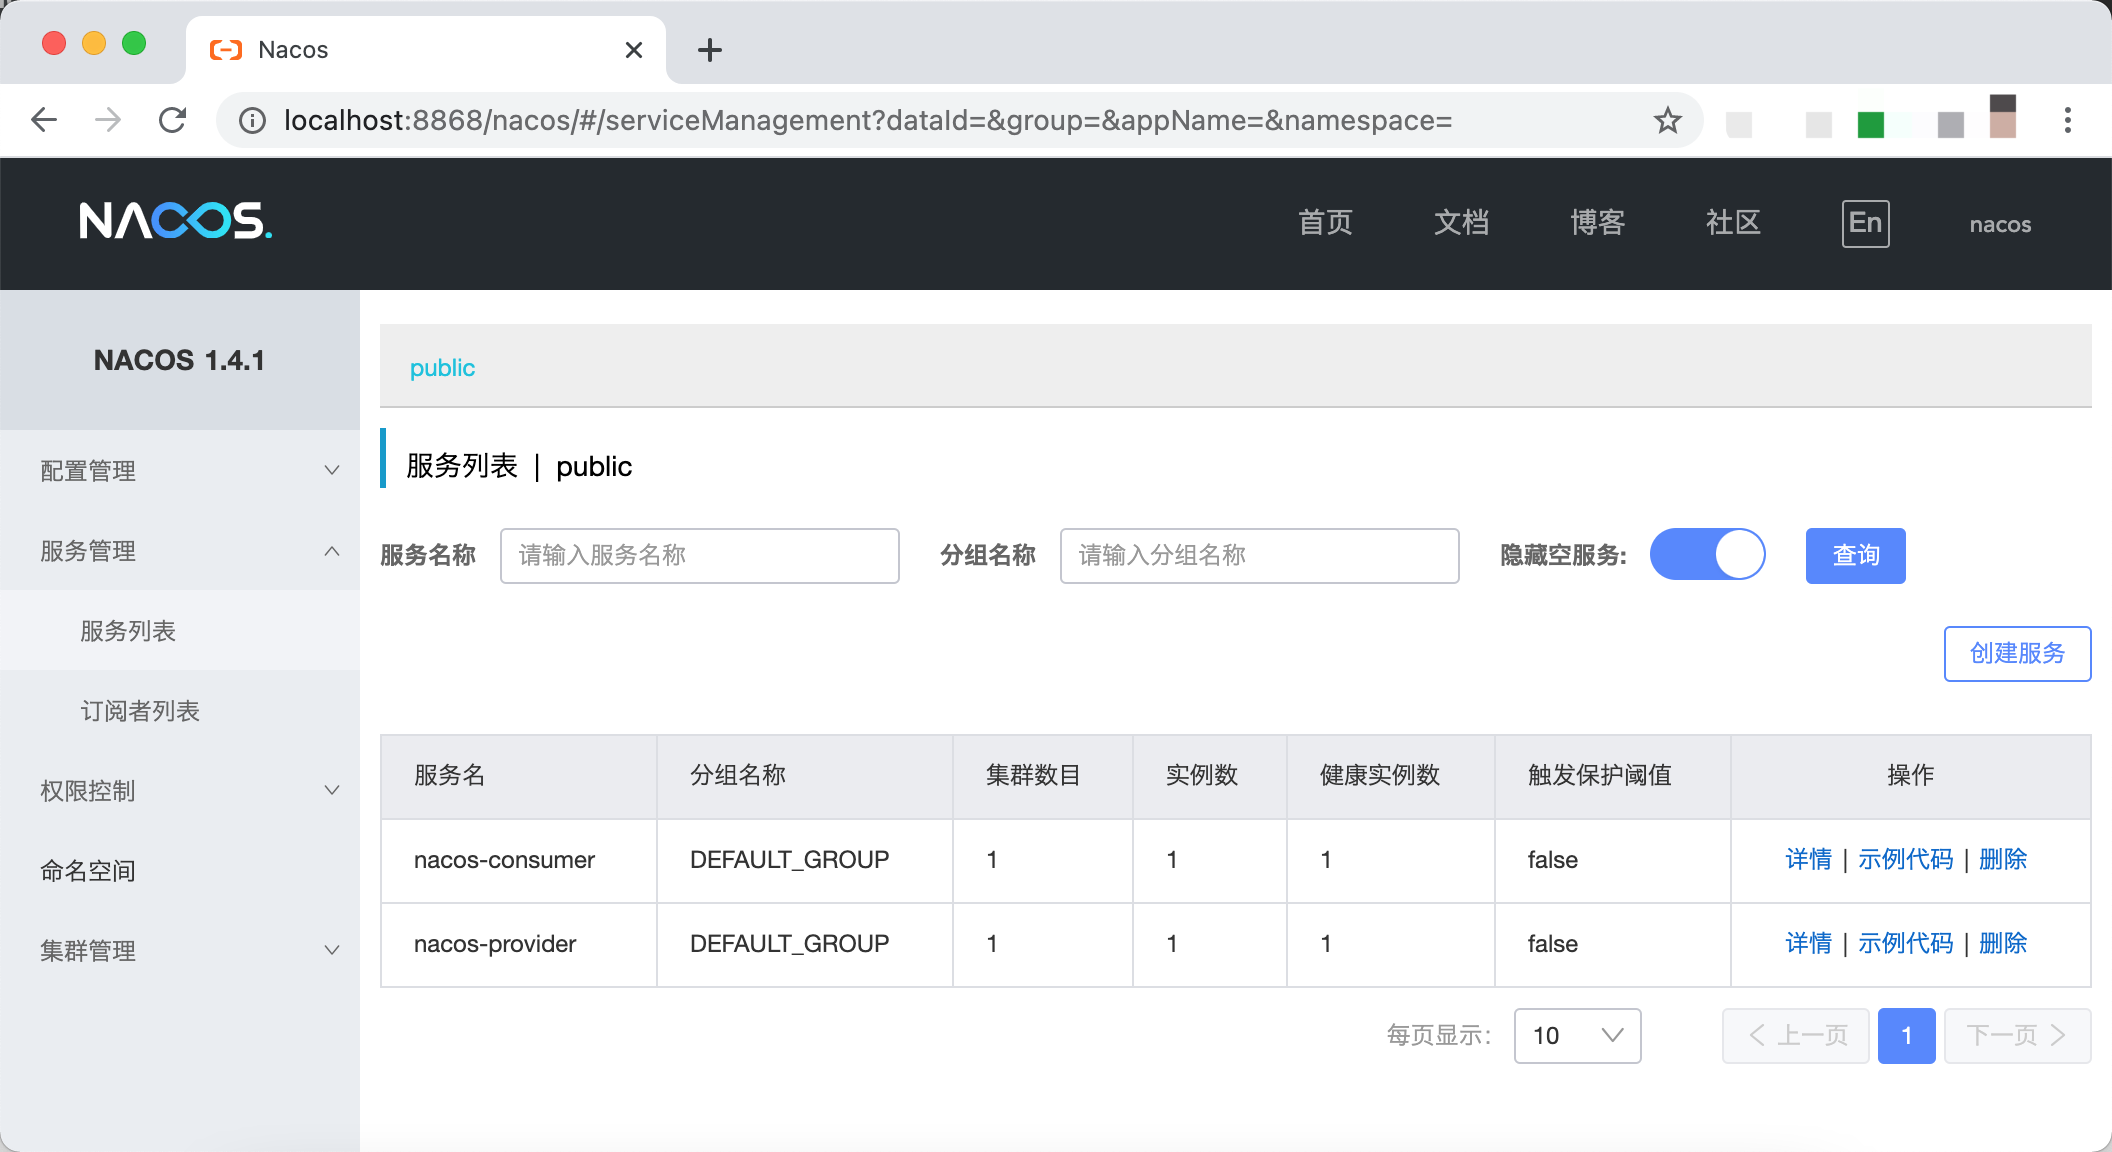
调用接口 http://127.0.0.1:8070/echo/will.me,返回:
Hello Nacos Discovery will.me
子项目-nacos-sidecar使用
创建sidecar应用
首先创建一个简单的web服务simple-web作为sidecar;
@SpringBootApplication
@RestController
public class SimpleWebApplicationClass {

    public static void main(String[] args) {
        SpringApplication.run(SimpleWebApplicationClass.class,args);
    }

    @GetMapping("/health")
    public String health(){
        return "{\"status\":\"UP\"}";
    }

    @GetMapping("/hello")
    public String hello(){
        return "I'm not java";
    }
}
端口
server:
  port: 8081
sidecar-simple模块
然后创建一个nacos-sidecar模块测试,pom文件如下
<dependencies>
    <dependency>
        <groupId>com.alibaba.cloud</groupId>
        <artifactId>spring-cloud-starter-alibaba-sidecar</artifactId>
        <version>2.1.1.RELEASE</version>
    </dependency>

    <dependency>
        <groupId>com.alibaba.cloud</groupId>
        <artifactId>spring-cloud-starter-alibaba-nacos-discovery</artifactId>
        <version>2.1.1.RELEASE</version>
    </dependency>
</dependencies>
主要看配置文件
server:
  port: 8088
spring:
  cloud:
    nacos:
      discovery:
        server-addr: localhost:8848
  application:
    name: sidecar-simple
# 配置异构服务
sidecar:
  ip: localhost
  port: 8081
  health-check-url: http://localhost:8081/health
我们将这个服务也注册进nacos中,这里和前面nacos-provider不同的是,这里增加了sidecar,也就是我们之前创建的springboot web应用;
consumer消费
这时,在之前创建的nacosconsumer模块中增加一个controller
@RestController
public class SideCarConsumer {
    @Bean
    @LoadBalanced
    public RestTemplate restTemplate() {
        return new RestTemplate();
    }

    @Autowired
    private RestTemplate restTemplate;

    @GetMapping("/hello")
    public String hello() {
        return restTemplate.getForObject("http://sidecar-simple/hello", String.class);
    }

    @GetMapping("/health")
    public String health() {
        return restTemplate.getForObject("http://sidecar-simple/health", String.class);
    }
}
这里使用服务访问而不是通过ip访问,sidecar-simple对应的前面创建的带有sidecar的服务;
然后将三个应用启动,访问http://localhost:8088/hello和访问http://localhost:8088/health即能访问到前面创建的springboot web应用,而这个应用我们是没有注册到nacos中的。
附:源代码
完整的源代码请参考:
https://github.com/WillJE/spring_boot_nacos
参考资料
- Nacos Spring Cloud 快速开始
- Spring Cloud 使用 Nacos 作配置中心
- Nacos部署中的一些常见问题汇总
- Spring Cloud Alibaba基础教程:Sentinel使用Nacos存储规则
- Nacos配置中心原理
- Spring Cloud Alibaba基础教程:Nacos的集群部署
- Spring Cloud Alibaba基础教程:Nacos的数据持久化
- Spring Cloud Alibaba基础教程:Nacos配置的多文件加载与共享配置
- Spring Cloud Alibaba基础教程:Nacos配置的多环境管理
- Nacos 集群部署模式最佳实践- 徐靖峰|个人博客
- nacos-sidecar应用